
Home / 3M / 3M Collision Repair / Paint Finishing

3M™ Paint Finishing
Featured Applications
00:00 — 3M is excited to introduce our latest generation of premium paint finishing products, providing you with an easy-to-follow process to achieve a defect-free finish.
00:10 — For those desiring more technical details about each process step, please visit our website.
00:15 — As in any auto body repair process, personal protection is a must. Remember to wear protective eye wear, gloves, hearing protection, respirator and protective clothing, based on your exposure assessment.
00:28 — When sanding is required to remove texture and paint defects throughout an entire panel, using a six-inch dual-action sander is the most productive method.
00:37 — Attach a 3M brand Purple Finishing Film grade P1500 or P2000 grade disc to the sander. A soft interface pad is recommended, but not required.
00:49 — Sand the panel until the defects are removed, and the texture is level to match adjacent panels.
00:54 — When the desired results are achieved, clean the sanding dust off the panel before moving to the next step.
01:00 — In this step, you’re refining the sand scratches created by the P1500 or P2000 abrasives in the denibbing and texture-matching step.
01:09 — Using a 3M Trizact brand 3000 disc on a dual action sander with an interface pad, spray the disc and the surface to be sanded with water using a spray bottle.
01:19 — When using Trizact 3000, it is recommended to be used damp, not wet.
01:24 — Sand with medium pressure, using five to six overlapping passes, until a light slurry covers the repair area.
01:31 — Cross-sanding with the dual action sander creates a uniform finish.
01:35 — Clean the surface with a microfiber towel, and inspect the surface to ensure the scratch refinement is complete.
01:41 — Once this initial scratch refinement is complete, you’re now ready to move on to further refining the sand scratches in the next step.
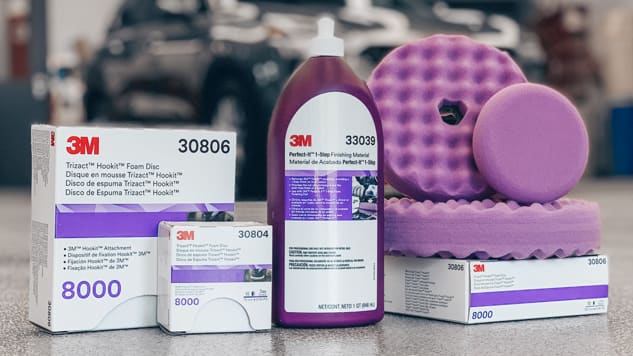
01:48 — To obtain the ultimate finish, and eliminate the compounding step, scratch refinement with a 3M Trizact 8000 disc is required.
01:57 — With this step, you’re refining the sand scratches to the point where you actually begin to polish the paint, eliminating the need for compounding, which means no more swirl marks.
02:07 — Using a Trizact 8000 disc on a dual action sander with an interface pad, spray the disc and the surface to be sanded with water using a spray bottle.
02:16 — When using Trizact 8000, it is recommended to be used damp, not wet.
02:21 — Sand with medium pressure using five to six overlapping passes, until a light slurry covers the repair area.
02:28 — Cross-sanding with the dual action sander creates a uniform finish.
02:32 — Clean the surface with a microfiber towel, and inspect the surface to ensure the scratch refinement is complete.
02:38 — Once the scratch refinement is complete, you are now ready to move on to further eliminating the sand scratches in the next step.
02:45 — The most unique aspect of the 3M Trizact 8000 disc is that it eliminates the need to use compound.
02:52 — Your only polishing step is with 3M Perfect-It 1-Step Finishing Material and the 3M Perfect-It 1-Step Foam Polishing Pad.
03:01 — Attach a purple 3M Perfect-It brand 1-Step Foam Polishing Pad to the buffer, and set the polisher between 1200 and 2000 rpm.
03:11 — Apply polish to the repair area, and polish with medium pressure.
03:18 — Remove any residual polish off the panel using a different microfiber cloth, and inspect to ensure the finish is perfect.
03:25 — Reapply polish and continue buffing as needed.
03:34 — For more information, visit our website at 3MCollision.com, or contact your local 3M distributor or your 3M sales representative.
Large Area Repair without Compounding
Take a look at this step-by-step guide to using the 3M™ Perfect-It™ 1-Step Paint Finishing System to repair full panels of a vehicle. Learn our technicians’ tips for getting the best results at each step including optimal tool speeds, pad types, dampness levels and more.
Paint Finish with Compound: Full Panels
This SOP covers the basic steps for finishing full panels, starting with defect removal and texture matching and proceeding through scratch refinement, compounding, polishing, final detailing and inspection.
00:06 — 3M is excited to introduce our latest generation of premium paint finishing products, providing you with an easy-to-follow process to achieve a defect-free finish. For those desiring more technical details about each process step, please visit our website. [www.3MCollission.com/library/sops]
00:26 — As in any auto body repair process, personal protection is a must. Remember to wear protective eyewear, gloves, hearing protection, respirator and protective clothing based off of your exposure assessment.
00:40 — First, let’s talk through the abrasive steps. After determining a vehicle requires paint finishing to remove defects or match adjacent panel texture, start with 3M Purple Finishing Film Hookit, using either a P1500 or P2000 grade disc.
00:58 — Dry sand the affected area using a DA with an interface pad. 3M recommends using our recently launched P2000 grade, which will allow users to achieve a similar cut to P1500, with a finer finish reducing process time.
01:13 — Once the defect has been removed, and texture has been matched, begin the scratch refinement process with a 3M Trizact 3000 Foam Hookit abrasive disc. Note that the Trizact technology is designed to be used damp.
01:30 — Using a DA with a soft interface pad, refine P2000 grade sand scratches from the panel.
01:35 — Make certain to cross sand in all directions, ensuring that all P2000 grade scratches have been removed. Using Trizact, refine sand scratches without leveling texture, and can reduce compounding time.
01:50 — To complete the abrasive portion of the process, use a 3M Trizact 5000 foam Hookit abrasive disc to further refine sand scratches. Like Trizact 3000, Trizact 5000 is designed to be used damp, and with an interface pad.
02:07 — Incorporating this product into the process can substantially reduce compounding time. Before moving on to the buffing steps within the paint finishing process, it is important to thoroughly clean the vehicle surface, removing all sanding residue. [3M Perfect-It Detailing Cloth]
02:22 — Repeat this cleanup process after each of the following compounding and polishing steps. This will help avoid cross-contamination, which can lead to rework in the process.
02:33 — Now let’s talk about the buffing steps, using the 3M Perfect-It EX system of products. Start with 3M Prefect-It EX AC Rubbing Compound; buffing the surface until sand scratches are removed.
02:47 — Used in combination with a 3M Perfect-It Quick Connect Compounding Pad, which is available in both foam and wool.
02:54 — When using 3M Trizact 5000, 3M recommends using a Quick Connect Foam Compounding Pad, which will leave fewer swirls, and can reduce polishing time.
03:04 —By cutting fast, slinging less, and cleaning up easier, 3M Perfect-It EX AC Rubbing Compound can reduce process time, allowing you to increase productivity.
03:18 — Between buffing steps, 3M recommends using 3M Inspection Spray to remove any residue, and reveal the true finish of the surface.
03:26 — Using Inspection Spray in combination with a 3M PPS Sun Gun light further improves the chance of spotting any remaining defects.
03:35 — Continue on to the 3M Perfect-It EX Machine Polish, buffing until all compound swirls are removed.
03:42 — Used in combination with a 3M Perfect-It Quick Connect Foam Polishing Pad, 3M Perfect-It EX Machine Polish is 3M’s latest innovation, and will stay wet longer, allowing you to quickly achieve a great finish, while using less material.
03:57 — The 3M Perfect-It EX system is designed to be used with 3M Perfect-It Quick Connect Pads, which are available in six- and eight-inch sizes.
04:00 — Quick Connect is a 3M patented technology that allows pads to stay self centered, stay securely connected, and be quickly interchanged while buffing, making the process easier for you.
04:20 — The final product to use in the paint finishing process is 3M Perfect-It EX Ultrafine Machine Polish, which quickly and effectively removes extremely fine polishing swirls, or halos, used in combination with a 3M Perfect-It Quick Connect Ultrafine Foam Polishing Pad.
04:36 — Step three is not intended to be buffed dry, and any residual material should be cleaned up with a dedicated microfiber cloth. Because 3M Perfect-It EX Ultrafine Machine Polish permanently removes swirls without waxes or fillers, users can reduce potential reworks, especially on dark-colored vehicles.
04:58 — For more information, visit our website at 3MCollision.com, or contact your local 3M distributor or your 3M sales representative.
3M™ PERFECT-IT™ 1-STEP PAINT FINISHING SYSTEM
Get a deeper, glossier finish without the mess, the stress or the rework of compounding. Trizact™ 8000 removes very fine defects in painted surfaces, taking the place of compounding to increase your business efficiency. Follow with our specially formulated 3M™ Perfect-It™ 1-Step Finishing Material and purple 3M™ Perfect-It™ 1-Step Foam Finishing Pad, which deliver the cut of compounding with the fine finish of polishing.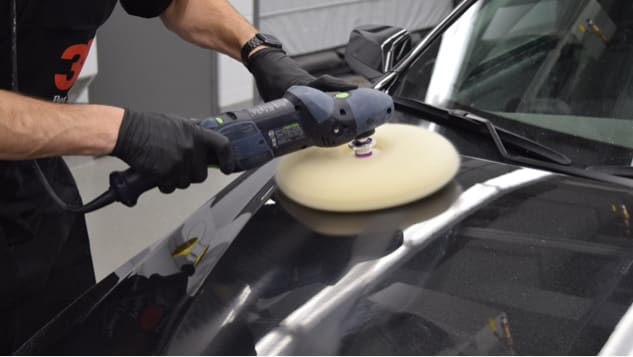
3M™ PERFECT-IT™ EX PAINT FINISHING SYSTEM
For those who prefer to compound, our classic 3M™ Perfect-It™ Paint Finishing System offers products for every stage of the paint finishing process. From defect removal with 1500-grade 3M™ Trizact™ Hookit™ Foam Abrasive Discs to compounding with Perfect-It™ EX AC Rubbing Compound and swirl removal with 3M™ Perfect-It™ EX Machine Polish, our classic system will leave a refined finish on all painted surfaces.© Copyright 2025. National Automotive Parts Association. All Rights Reserved